Traditional Christmas Cake
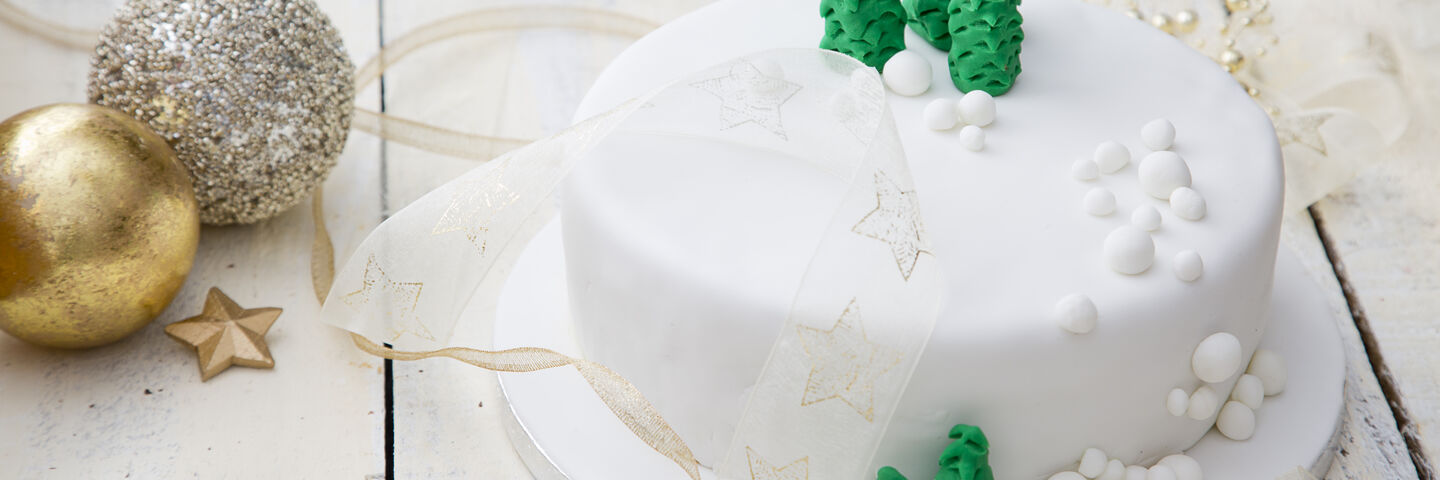

While it may look or sound tricky, making and decorating this cake is really achievable. Luckily, there is no pressure to get it all made at once as Christmas cakes and stages of decoration can be done slowly.
9 people
0 minutes
0 minutes
Ingredients
- 1 tsp Baking Powder
- 1 tbsp Black Treacle
- 225 g Dark Muscovado Sugar
- 1 - Double Sided Tape or pins
- 1 - Edible Glue
- 1 - Edible Glue
- 3 large Eggs
- 1 - Fine Craft Paint Brush
- 1 - Fine Craft Paint Brush
- 50 g Glace Cherries chopped
- 2 tsp Ground Cinnamon
- 1 - Lemon finely grated, zest only
- 350 g Marzipan
- 2 tsp Mixed Spice
- 225 g Plain Flour
- 125 ml Powers Irish Whiskey plus 3tbsp for feeding
- 1 - Ribbon 1 metre of 1.5cm wide, optional
- 70 cm Ribbon plus extra for tying in a bow, optional
- 1 - Smoother Tool
- 1 - Smoother Tool
- 1 tbsp SuperValu Cornflour for dusting
- 50 g SuperValu Ground Almonds
- 0.5 tsp SuperValu Ground Nutmeg
- 1 tbsp SuperValu Icing Sugar for dusting
- 1 - SuperValu Orange finely grated, zest only
- 225 g Unsalted Butter softened, plus extra for greasing
- 175 g White Ready-to-Roll Icing
- 325 g White Ready-to-Roll Icing
- 50 g Whole Blanched Almonds finely chopped
Decorating:
-
100
g
Green Ready To Roll Icing
For The Cake:
-
750
g
SuperValu Dried Fruit
to include currants, raisins, sultanas and mixed peel
For the Marzipan Layer
-
2
tbsp
Apricot Jam
Icing A Cake Board:
-
1
tbsp
SuperValu Cornflour
for dusting
Icing The Cake:
-
1
-
Edible Glue
You Will Need:
-
1
-
Fine Craft Paint Brush
-
25.5
cm
Round Cake Board
-
1
-
Small Pointed Scissors
-
1
-
Smoother Tool
Method
- At least 24 hours before making the cake, toss the dried fruit, cherries and 125ml of whiskey together in a bowl. Cover and leave to soak, giving it a shake about every so often.
- Preheat the oven to 150°C/gas mark 2. Butter a 20cm (at least 7.5cm deep) round loose-bottomed cake tin well. Line the base and sides with a double layer of non-stick baking paper and grease again. Set aside on a baking sheet.
- Using an electric mixer, beat the butter and sugar together for a few minutes, until pale and fluffy. Add tge lemon and orange zest and treacle and mix in. Add the eggs one at a time, mixing well before adding the next one.
- Toss the flour, ground almonds, baking powder and spices together in a bowl. Add a heaped spoonful at a time into the cake mixture, beating it in as you go. Add the soaked fruit and any remaining whiskey from the bowl along with the finely chopped almonds. Beat until everything is well blended.
- Spoon the tin and spread the top smooth, Bake in the oven for 2.5 to 3 hours. If it's starting to look dark on top, cover it loosely with foil. When cooked, a skewer inserted into the centre of the cake should come out clean.
- Remove and pierce all over with a skewer and slowly drizzle 3 tablespoons of whiskey over until it sinks in. Cover with foil and set aside until completely cool.
- Once cool, remove from the tin, wrap well in parchment paper followed by tin foil and store in an airtight container until ready to decorate. Ideally allow at least a week before decorating, but up to a few months is perferable to allow it to mature. In this case, drizzle a little whiskey over the cake every couple of weeks.
For Decorating:
The Marzipan Layer
- Turn the cake upside down so that the bottom now makes a nice flat top. Gently warm the apricot jam to loosen it, pass through a fine-mesh sieve if lumpy and brush it all over the cake.
- Dust your hands and the work surface with a little icing sugar and knead the marzipan until soft and pliable. Keep any marzipan not being used well wrapped and airtight to avoid it hardening before it's needed. Roll out any marzipan to about a 30.5cm circle that's about 3mm thick. Carefully lift onto the cake and press it on top and down the sides evenly. Use a small sharp knife to trim the bottom for a neat finish. Use the smoother tool to press the marzipan on smoothly.
- Cover the cake with a clean tea towel and leave in a cool place for at least 24 hours. It's important to give the marzipan the full 24-hour time period to allow it to dry out a little and therefore avoid the icing paste from becoming moist and then soggy. The cake is now ready for icing.
Icing A Cake Board:
- Whether for yourself or as a gift, present your cake on a cake board for a professional finish and to make it easier to move it around. Choose whatever colour icing you like to suit your cake. White is the most popular choice for this. Keep any ready-to-roll icing not being used well wrapped and airtight to avoid it hardening before it's needed.
- Dust a work surface with a little cornflour and roll the icing out to a circle a bit bigger than the cake board and about 3mm in thickness. Brush a light coating of edible glue all over the surface of the board. Lay the disc of icing paste on top, pressing it down lightly to stick. Smooth all over with the smoother tool. Use a small sharp knife to trim away the excess icing from the edge of the board (well wrapped and reserve for decorating the cake). Holding the board up is the best way to do this.
- Wrap some ribbon around the outer edge of the board to complete the decoration if liked, attaching it with pins or double-sided tape.
- Ideally, leave the board in a cool dry place for at least 24 hours to allow the icing to harden before sitting the cake on it.
Icing The Cake:
- Lightly brush the marzipan layer all over with edible glue. Dust a work surface with a little cornflour and roll out the icing into a 30.5cm circle that's about 3mm thick. Carefully lift it onto the cake and press it on top and down the sides evenly. Use a small sharp knife to carefully trim the bottom for a neat finish (wrap any trimmings and reserve for decorating the cake). Use the smoother tool to press the icing on smoothly. Don't worry too much if it's not perfect, as the decorations and ribbon, if using, can be used to hide any creases or marks.
- Carefully position the cake on the iced board, positioning it off centre to allow for decorations to fit on the board too. Wrap the ribbon around the cake, if using securing it with a pin or tying it in a bow.
Decorating:
- Divide the green icing into five pieces of varying sizes (for example, 5g, 10g, 15g, 20g and 50g). Taking one piece at a time, roll it between your hands to warm and soften. Once it's pliable, roll it into a chunky sausage shape, then tap off one end off a surface to flatten it. Shape the opposite end into a point so it resembles a Christmas tree. Snipping with just the tip of the scissors, snip little tufts all over the icing shape to create a Christmas tree texture. Repeat with the remaining pieces. Decide on their positions on the cake and cake board before dabbing a little glue on their bottoms to stick them down.
- Using the reserved white icing trimmings, shape as many small balls as will allow. These will be snowballs and look fun in varying sizes. Again, decide on their positions on the cake and cake board before dabbing with a little glue to stick them down. They also look great cascading down the side of the cake.
- Tip: Although the green icing is of course edible, it's probably best for kids not to get their hands on the trees (as tempting as they are!) as they may consume a lot of green food colour!


